Last spring the world aligned in such a way leading to what I can only describe as a collapse in judgement wherein I purchased an actual device to start my seeds in. Firstly, I am a gluttonous gardener and had compiled a frightening collection of seeds to grow, and then Lee Valley had the gall to open a store in downtown Toronto, luring me into their crack den of nearly useless gadgetry and fancy door locks.
I broke down and purchased Lee Valley’s Styrofoam Windowsill Seed Starter last season knowing it would be problematic but having been sold on a few key features: it’s just the right size to fit my narrow old-school window ledge, and it’s self-watering. While you can get your seeds started in just about any old yoghurt container or milk carton, gardeners who are short on space will empathize with my dilemma, How do I grow the maximum number of seedlings in the tiniest amount of space? The answer, like most quandaries in life comes down to finding a system that presents the least number of problems… or growing less seeds. Not going to happen. In fact my list for this year has increased!
Here’s what I wrote last year:
- I pay $20 for Styrofoam so you don’t have to. [ed. Here’s where I convince myself I am doing this all for you.] The first problem I noticed was no tagging system. I fixed that by fashioning tiny tags that don’t interfere with the dome using toothpicks, sticker paper, and an indelible marker. So far I don’t mind it as it fits perfectly on my narrow windowsill and I haven’t had to even think about watering for days. However, seedlings are only just starting to emerge and my suspicion is that the real challenge will come as they near transplant size.
The challenge I am referring to is the starter’s tiny cell size. Sure you can start a lot of seeds in a small space but what happens when those tiny seedlings start to grow? Lee Valley’s write-up on their website suggests using the starter for slow-growing plants such as broccoli and lettuce. Now, lettuce is a cold crop that does not require a start indoors, and I don’t know about you but I would hedge a bet that people with small indoor spaces often have small outdoor spaces. What percentage of those people intend to grow more broccoli in that small space than tomatoes? Just saying.
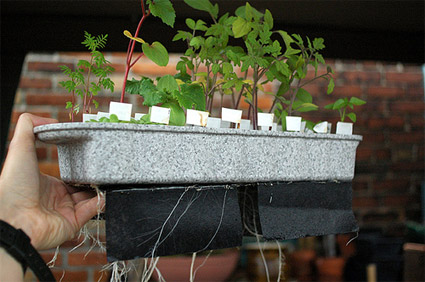
So here’s what my plants looked like about three-quarters of the way to planting time:

-
You can see that the plants are a bit leggy (tall and thin). This is the reality of windowsill growing. My window is south-facing and gets good light but it’s just not as ideal as an artificial lighting set-up.

-
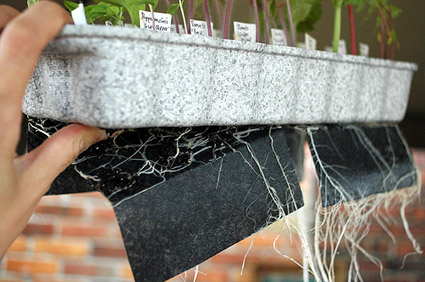
A massive tangle of roots was created causing some stress on transplant. You know, what with all of the ripping and the tearing. Hint: Seedlings hate that.

-
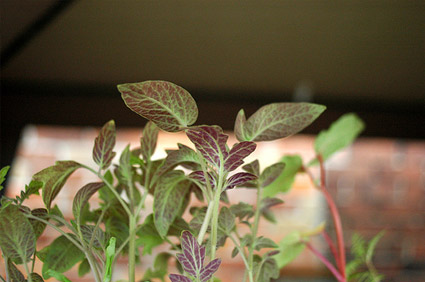
Purple colour on the underside of tomato leaves is a sign of potassium deficiency. I transplanted these seedlings to recycled transplant containers shortly after taking this photo. The seedlings came around and lost that purple tinge once they had some room to spread their roots and take up nutrients. I watered regularly with sea kelp and added a bit of vermicompost to each pot at transplant time.
In the end is all of the fuss worth it? The advice I always give and stick by is to save your pennies and employ transplant-sized, reusable containers to get the job done. Starting with appropriately-sized containers that will take you from seed to transplant means less work in the long-run and prevents any desperate late-spring juggling acts to find enough light for all of your much-larger-than-anticipated seedlings. But of course if you’re like me and you’ve got bigger dreams than seed-starting space I would suggest saving your tomatoes for regular-sized containers and trying hot peppers, annual flowers, and just about anything else in the windowsill starter. Or if you’ve got to have those extra tomatoes you can do what I will probably do, give it a go now, panic later.
Well I have one too and my beef is that the soil stays too wet and moss and deposits gather on the top. I want to try with high vermiculite mix to see if it will not bring as much water up. I transplant to larger containers like clear gathered styro or paper cups a la Starbucks or so! My favourite is the Jiffy pellet because you can use almost any kind of tray to hold them and water in. One thing I am doing is taking the little net jacket off when I transplant.
The soil used plays a big part in how wet it stays. I didn’t have any problems with fungal issues though and that’s really all I care about. It’s damp like it should be but not soaking. One advantage for a beginner is that they don’t have to fuss about keeping the soil consistently wet.
Funny because I like this system a lot more than the Jiffy pellet — I often advise people against them. I find Jiffy pellets are over-priced (at least with this system you use your own soil), the soil is all peat (they dry out easily and are hard to rewet if they go too dry) and the pellets are SO SMALL. You’ve got to have a lot of space to expand because once you repot all of those tiny pellets become a mass of containers. It’s fine for people with a lot of room but small-space people often run into the problem of starting too many pellets and then having nowhere to expand to…
I hate that mesh stuff on the Jiffy pellets too. Pulling it off can do some damage to your seedlings’ roots depending on how grown they are…
When you start growing seeds, space is always a problem. My eyes are always bigger than the available space to grow! I made up a new mix of 3 parts vermiculite and 1 part Schultz potting mix to see if this would give a better medium. Maybe it won’t draw enough water. Check out some of the pics on my blog.
Clayton
Vermiculite is water-absorbing.
Because a lot of people reading are new gardeners I want to mention that Shultz products include chemical fertilizers and are not suitable for anyone who is growing organically.