Seed-starting season is in full swing in these parts. I’ve been getting loads of questions about it via email and figured it was time to put together a seed-starting recap here on the site.
I started my own tomato, pepper, and tomatillo seeds this weekend and put in orders with two seed companies to complete my 2007 Scary Mega Plant List. This last order totalled about 25 packs of seeds coming in at roughly $75 US. When you take into account that this does not include the transplants I will get in early June… well now you know why it’s the “Scary Mega Plant List.” I don’t want to scare anyone off and give the impression that gardening has to be this expensive. I do not fall into the norm since I consider my garden to be an experiment and a BIG, BIG part of my job. I grow as many new varieties as possible every year in search of beautiful, drought tolerant, delicious, and container-suitable plants to share with you. Most people do not grow 5 different pea varieties on their urban rooftop!
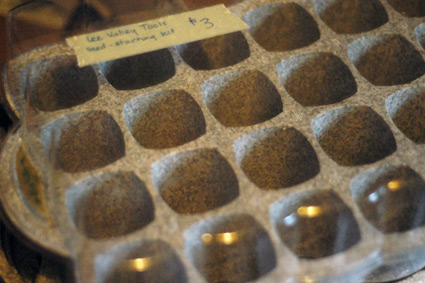
First I’ll show you my plan for this year. In my last post I gave a review of the Windowsill Seed Starter. What I did not mention is that I managed to snag the larger version at a garage sale for $3! The larger version is much more reliable with larger pockets that will keep your seedlings healthy for a more reasonable length of time — the downside being that it will not fit on a windowsill.
Because I am short on space I have a crazy plan based on last year’s experiment in which I moved my final repotted transplants to a window in the hallway of our apartment building to live out their final days before heading outside. By the time they were large enough to repot, the hallway was warm enough to accomodate them. It also made a nice transition from cushy to slightly-less-cushy. I’m pretending that was one stage in the hardening-off process. When faced with obstacles it helps to wrap them in a thin veneer of positivity.
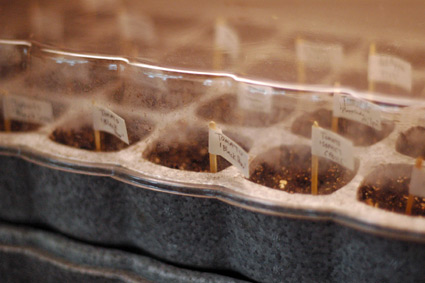
Here you can see the little tags I made using toothpicks, sticker paper, and indelible ink. The other major downside to this kit is that it is too tall to work with my beloved heating mat. It’s been unseasonably warm so I think I’ll be fine without it.
Seed-Starting Mix
These are the ratios I prefer. If you don’t need a huge batch you can use this as a basis for choosing a store-bought seed-starting mix. Always read the label and look for an ingredients list. Most popular brands have chemical fertilizers added that are both unneccesary, but will defeat the purpose of growing organically. Instead, buy a basic mix and add in your own organic materials. I suggest adding a touch of vermicompost and watering your plants with a diluted sea-kelp mix. To be clear, seeds do not require any fertilizers until they produce their first set of “true leaves”. In basic terms this means the second set of leaves you will see. The first leaves that appear are called “seed leaves” and feed the seedling until the first “true leaves” appear.
- 1 part peat or coir (Coir is a sustainable peat substitute made from coconut husks. Peat is mined from marshland, destroying natural habitats. When you can, use coir.)
- 1 part perlite (popped volcanic ash that creates good drainage.)
- 1 part vermiculite (water absorbing material made from the mineral mica)
Resources
- You Grow Girl – There’s a huge section on seed-starting covering everything you need to know to go from setting up your own little grow-op to getting your plants outside and into the soil.
- Germination and Damping Off
- A Beginner’s Guide to Vegetable Seed Starting
- A Quick and Easy Germination Test
- Growing Healthy Tomatoes
- Tall & Floppy Seedlings – Outlines a cheap and easy lighting set-up that will prevent ‘leggy’ seedlings.
- Handy Seed-Starting Chart
- The Lazy Gardener’s Seed-Starting Chart – Plugs in the numbers for you using excel.
– A printable pdf file.
Is perlite and Coir available at Rona or Home Depot or do I have to find somewhere fancier? What is vermicompost? AND do you have a sea kelp fertilizer you like and is that also easier to find? I am totally doing it your way this year. I am lucky to have shelves with grow lights in a south face window. Also, what do you consider large enough to repot and what size of pot do you transfer tomatoes to? I am FULL of questions. and other stuff.
You should be able to find a bag of perlite at a Canadian Tire or Home Depot…I’ve bought it there before.
You can get perlite just about anywhere… although don’t get me started on the hell that is finding sand in the city!
Coir is trickier because it is still considered a marginal eco-friendly ingredient. I know places that sell it in Toronto (Grassroots for example) but only seem to see it here and there on my travels.
Vermicompost is literally worm poo aka “castings” (the nice words for people who don’t want to say worm crap). You can purchase it in bags or you can make your own by composting with worms. I would suggest looking up the worm dudes in your area… the companies that sell composting worms. They usually sell the compost too. I have used Jolly Farmer certified organic castings and have been happy with that brand. I should stress that vermicompost is a fantastic “balanced” soil amender/fertilizer that is safe and does not smell. You can use it on indoor plants or outdoor plants by just sprinkling some on the surface. Some people also buy it as a tea for watering. It is literally good shit. Har.
You won’t need to repot if you are growing your seeds in a standard 4″ transplant pot (the kind your transplants come in when you buy them from the store). Otherwise you will probably need to repot to that sized container before transplanting season starts (varies depending on the plant). Generally you want to do it before the roots get too big for the current container and end up like this.
I like a few types of sea kelp/seaweed. You can get the liquid concentrate that is really easy to use. All you do is add a bit to water. That should be fairly easy to find. A lot of brands bottle it now-a-days.
I like the dry stuff too (aka kelp meal) but for different reasons. You can mix it right into the soil as an amender and it’s cheaper. I buy bags of it from Urban Harvest and then steep it in bottles like a tea. A bag will get you through one season at least… and that’s regularly fertilizing your entire garden throughout the spring and summer. I add it to spray bottles and spray my plants with it too. Sea kelp is high in potassium which is a good stress reliever for your plants…. helps them through the tough times. People like the concentrate because it doesn’t smell but I don’t mind the smell of the dry stuff since I mainly use it outside and only use small quantities indoors.
Gayla,
I am one of the new plantlets. I was wondering what type of pea varieties are good for container size garden. Also.. I was wondering if there was a special place that you like to order your seeds that caters to the fire escape gardener? (I have perused the usual: Territorial, Burpee, Parks etc)
Saw your tomato babies in the new post and wondered what varieties you are starting and whether they are determinant or not.
Clayton
Clayton: I haven’t been listing the varieties because I’m growing varieties I have never grown before and want to have some experience with them before making recommendations.
But I will say that ‘Black Pear‘ is a new-to-me indeterminate favourite from last year.
‘Black Seaman‘ and “Silver Fir Tree’ are two mid-sized determinates and heirlooms that I would recommend. I also like ‘Sunrise III’ a much smaller determinate that is a hybrid. I generally don’t grow hybrids but have made an exception because my spouse likes it so much.
Sandy: ‘Tom Thumb’ is the smallest pea variety I know of. It can grow in very small containers. I have grown many normal-sized pea plants in containers too but you’ll need to find some large, deep containers and use a stake. I don’t know of any one company that specializes in seeds for container gardens. I purchase mine from a variety of companies. Urban Harvest, Seedsavers.org, West Coast Seeds and of course trade locally.
http://www.plantbest.com/
Gayla, here’s a brand of coir that comes in slabs (rather than bricks) which I noticed in my local Home Hardware today – they’re based in Markham so should definitely be readily available in Toronto.
Their other product, Soil Sponge sounds ideal for you balcony/container gardeners – I think I’d like to know what the other 5 “proprietary” natural ingredients are before using it though.
I am really put off by that SoilSponge TM product and would never promote it here. “We won’t tell you what’s in it, but don’t worry cause it’s NATURAL.” It also bothers me that they repackage coir as PeatEliminator TM. Many things about this bother me.
Coir is easy to find in Toronto. It’s those living in the suburbs that have a harder time. Grass Roots has it and it looks like they are doing online sales now.
Thanks for the Jolly farmer link- however- I don’t see any listings for Toronto.
Does anyone know where I can get some for my transplants? Otherwise I’m going to the family farm tomorrow & so may just dig up my own manure -lol.
(& mebbe raid the barn for pigeon poop too)
thanks so much!
-Jen
I bought a bag of the Jolly Farmer in Toronto but it was from a vendor at the Herb Fair. And I heard they aren’t going to be there this year so…
Any “ways” I know to get vermicompost in Toronto are off the beaten path… three different vendors at Seedy Saturday but none of them have stores or supply to stores as far as I know. I think the Grass Roots store might be a good option but I would call ahead and ask. I was just there yesterday but didn’t check.
Hi there! I have a question…I’ve started some herb seedlings in these containers and some of them have grown too tall for the plastic top. Does this mean that it’s time to take off the plastic top? The weather is too cold here (Kitchener, Ontario) to plant them outside. Thanks!!!
Heidy
Heidy: You should take the top off. You don’t really need it once the plants are germinated. But you do want to keep them growing indoors for a while yet. You’re similar zone to me so the herbs probably won’t be going out for good until May-June (depending on what you’ve got). You may need to repot to larger containers before that time.
Thanks Gayla! I think we’ll need to repot them in something larger as well.
You can also start seeds in a bag. All you need to do is spread the seeds on paper towel, tissue or whatever, fold it over, place it in the bag, pour in some water, tie up the end and put it on top of your fridge. Once the roots come out you need to pot them. This method is especially good for heavily coated seeds.
Hi Gayla-
I’m the President of PlantBest, the company that makes both SoilSponge and PeatEliminator, which was mentioned here. (In our google search noticed your postings.) If you are looking for pure coconut coir, we do supply it to Home Hardware under their store brand called BeyondPeat (new this year) or ours, PeatEliminator, and to Home Depot (our brand, PeatEliminator only). Either 2.3 or 3 cubic feet for between $6 and 9 dollars, so very good value. SoilSponge is a blend of ingredients, so it shouldn’t be used if someone’s just looking for coir but it’s a good supplement. Sorry we don’t disclose all the ingredients…competitive reasons is all. If you or your visitors have any critique/comments on our products or how we merchandise them, we’re always open to critical opinions and feedback. thijsm@plantbest.com is my direct email…happy earth day. (By the way, we now make peat-free coir-based seed starting pellets too, so no more peat there either). Cheers,
That method is listed above. It is best for testing the viability of your seeds. It’s not the best method for seed-starting in general because there’s a lot of room for error and transplanting damage. There is no air circulation in a closed plastic bag which often results in moldy seeds.