Part 1 of this two part article can be found over here.
How to Make and Lay the Pathway
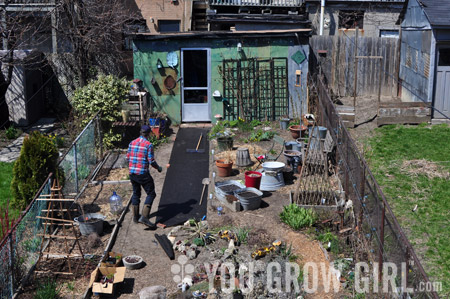
Step 1: Define the Path
I began this project two years ago so my path was already defined. To do that I laid down twine, and tied the ends to twigs to hold it in place. Some people use a hose to accomplish this, but I prefer twine because I can leave it in place and live with it for some time before committing to the final layout and pathway width.
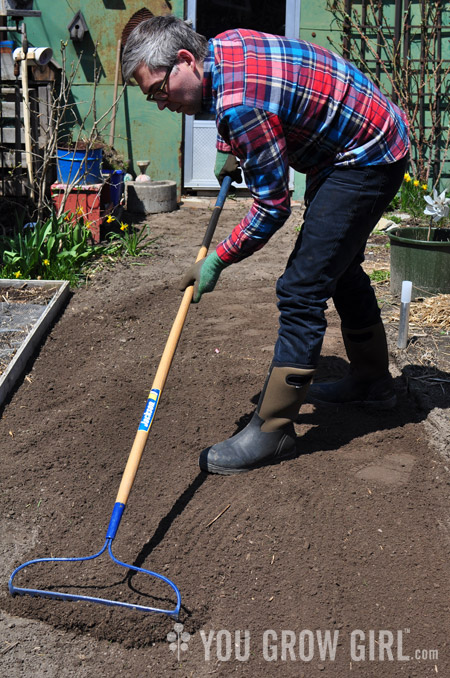
Step 2: Dig It Up
Even if you decide to solarize the grass, you will still need to remove some of the soil in order to make a shallow trench for the mulch to sit in. 2-4 inches is deep enough for mulch. You’ll want to go deeper if you are using gravel as that typically includes a layer of crushed stone in the bottom.
We went for a straight pathway so I used a straight-edged shovel to create neat lines. I used a heavy rake (mine is very similar to this one) to level the bottom of the trench. How careful you need to be with this step depends on whether or not you decide to lay down a layer of landscape fabric first (see next step). There are other paths in our garden that do not have a layer of fabric beneath the mulch, and in those cases I did not need to be so careful as the mulch filled in any small divots. Remove any large sticks, rocks, or other sharp bits that could pierce the landscaping fabric.
What do I do with the leftover grass?
Clumps of grass unearthed from even a small patch is surprisingly heavy. You can’t toss it into paper bags and set it on the curb for Municipal yard waste pickup. You can set it on the curb in a plastic bin, but be careful about how much you fill it. It isn’t fair to expect the pickup guys to lift it if you can’t.
Composting is ideal; however, grass can be slow to compost and too much will upset the balance of greens and browns in your bin. I’ve found that the best way to handle the leftover clumps of grass is to find somewhere out of the way that you can set it and forget it for several months, if not the whole garden season. We are lucky enough to have thin slivers of space on the sides of our ramshackle shed where we could toss the grass and let it compost without seeing it or worrying that it would take root.
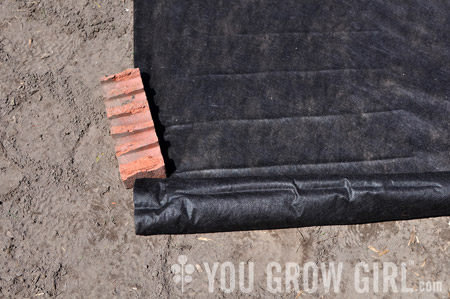
Step 3: Lay Down Landscape Fabric
You can choose to skip this step. As mentioned above, I did not lay down fabric on the smaller pathways. However, I chose to here because mulch breaks down into the soil. A layer of landscape fabric between the soil and the mulch slows the process down, reducing the need to top it with fresh mulch up annually. It also suppresses the small bits of grass and weed root that I missed and would be especially useful if there are particularly pernicious weeds in the area you are mulching.
If you want the landscape fabric to last, I suggest using a woven polypropylene fabric like this one made by DeWitt. The thin, plasticy stuff they sell at most DIY stores is garbage — it rips easily and doesn’t last very long. When buying in a pinch, I prefer to use the felt-like type. I recently used this one, purchased at my local, independent garden shop when I couldn’t wait to find something better.
Landscape Fabric Alternatives:
I am yet to try it, but this landscape fabric from Gardener’s Supply is made from recycled pop bottles and is a more environmentally friendly alternative. As a thrifty option, recycle old cotton bed sheets that have seen better days.
Start at one end of the path and secure the ends with garden staples/fabric pins. Place the fabric so that 1″ or so folds up the sides of the trench, creating a solid barrier that weeds can not come through. I didn’t have any fabric pins when I did this last bit of path so I used bricks and heavy garden tools to hold the fabric down until it came time to add the mulch. It is not a good idea to forego pins if you have a weed problem, or if you are using heavy-duty landscape fabric.
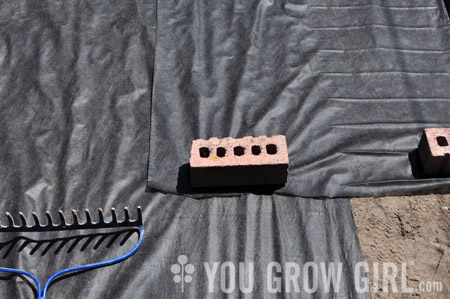
Slowly roll out the fabric, securing with a pin every few feet or so as you go. My pathway was wider than the landscape fabric, requiring that I do this in two passes. When you lay down the second layer, be sure that it overlaps with the first by a good 10-12″ or more. Again, this will ensure that there are no gaps for weeds to come up through.
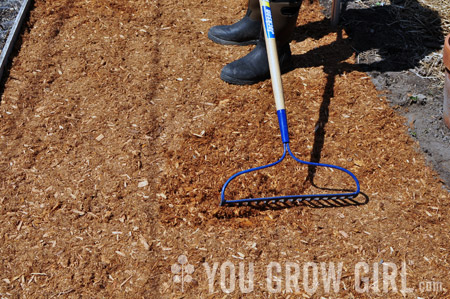
Step 4: Cover with Mulch
Lay down at least 3″ or more mulch on top of the fabric path and even it out with a heavy rake.
This is great. We actually mulched almost our ENTIRE backyard this way last year, because we had so many weeds in the back that it looked like a weed jungle. No matter how much we tried to dig them out, they grew back so quickly that we realized we were going to have to sheet mulch it.
So this is exactly what we did last year. We cut down all the weeds, left them in place, put a ton of black landscape fabric all over the back “lawn”, and then put cedar mulch all over it and left it for the rest of the year. (We left some beds at the sides of the yard and our raspberry beds intact, of course).
Unfortunately, some of the weeds did poke up through the fabric and mulch – it’s not a perfect solution – but not very many, and it was nothing like the previous few years.
Now, this year, we’ll be cutting out little spaces here and there for makeshift “raised beds” – we’ll be using old wooden shelves laid on their backs for the raised beds, with the backs taken off. We’ll cut a hole in the landscape fabric the size of the shelf, then lay down a bunch of cardboard on that space to choke out any remaining weeds, lay the backless shelf on that cardboard, then fill it up with soil. Looking forward to seeing how our experiment works!
Thanks for yet another inspiring post, Gayla!
Fabulous idea of path.i love paths. My hubby used landscape cloth under ours. He loves to cut cedar planks on his sawmill and uses them everywhere. I am so grateful for that. We ran out of landscape cloth and i wanted to make steps outside our lot where he put a gate and just climbs up the hill to access it. I want to put steps in there and perennials and rocks and driftwood. I am going to use your suggestion of old cotton sheets. We get them at the church thrift sale for $1 . Excellent idea. Thnx so much!