Winter is slowly coming to an end around here and it is nearly time to start lettuce outdoors. Until then I’ve been growing and harvesting small batches of micro-sized greens on my windowsill as a way to keep some salad fixings coming through the darkest and longest days of winter.
Microgreens are tender and tangy lettuce and mustard greens that are chopped off young, usually when they are only an inch or so high at the most and barely a few weeks old. They’re smaller and younger than baby greens, which tend to be harvested later when the plants have grown a good three inches tall or more.
It is this short growth span that makes microgreens possible to produce on even the darkest windowsills through the dingiest months of the year. Even the most beginner seed starter can take this growing project on since the plants only need to be kept alive for a few weeks tops. Unlike growing full-sized plants, it’s not the end of the world if they grow a little leggy (thin and stretchy) in the process.
Lettuce Greens to Try
Give yourself a break on the first time out by growing readymade storebought mixes that come in mild or spicy combinations. Some companies sell mixes that include the word microgreen on the package but any salad or mesclun mix can be grown this way. I like Urban Harvest’s Oriental Salad Mix (has a slight kick) and the Mild Mix prepared by Botanical Interests. Once you’ve got a taste for what you like try making your own mixes. It’s more cost effective and you can tailor make mixes that leave out any greens that don’t suit your taste buds.
Spicy: Peppergrass cress, ‘Giant Red’ mustard, radish, arugula, daikon radish, and ‘Wrinkled Crinkled’ cress.
Mild and Tangy: Tatsoi, mizuna, kale, lettuce, miner’s lettuce, and minutina.
How to Grow
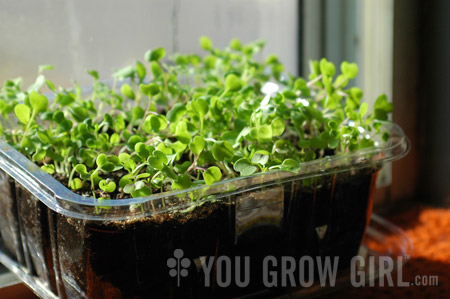
They’re not particularly attractive, but I grow mine in recycled plastic takeaway containers and clamshell packaging. They’re always on hand and tend to be the right size for the windowsill. To prepare, simply punch 5 or 7 drainage holes (I always go for odd numbers) into the bottom of a 9″ x 7″ package using an awl, sharp pair of scissors, or knife. Fill ‘er up with well-moistened container mix, potting soil, or seed-starting mix to within an inch or so from the top. Evenly distribute a thin layer of seeds, sprinkling them over the soil surface with about 1/8″ to 1/4″ of space between them. Cover the seeds with a thin layer of soil, about 1/8″ deep. Set it in the sunniest window you’ve got with the lid of the clamshell placed underneath as a drip tray. Water in well to get them germinating.
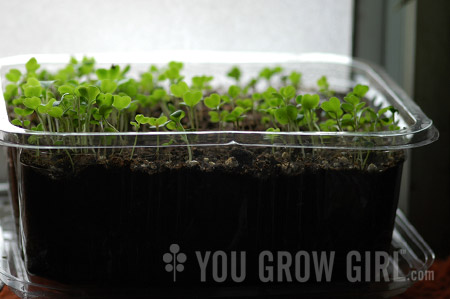
Sprouts at about the one week mark.
Keep the soil moist like a wrung-out sponge but not soaking wet. To avoid over-watering, dunk out any water that is still in the drip tray within an hour of watering. Microgreens can be harvested with a pair of scissors in 1 1/2-2 weeks depending on how large you want to grow them. I generally let mine grow until the moment their first set of “true leaves” begin to peek out. The first leaves you see are called “seed leaves” since they are actually a part of the seed. “True leaves” are the second set to appear and often look very different than the seed leaves.
Starting Again
Unfortunately, unlike when growing baby-sized and mature greens, you can not grow a second crop from the same stems. This is because the plants you are harvesting are essentially sprouts. Second crops grow from the upper part of the stem above the leaves, and these are harvested on the lower part of the stem below the leaves. The bad news is that you will have to start over with fresh seeds to produce another crop. The good news is that you can reuse the pot and soil if there were no problems with disease or pests on the first go-around.
To prepare for another crop, simply yank the remaining roots and stems out of the soil, toss them in the compost bin, and till the remaining soil with a fork. Sprinkle on a fresh layer of seeds, top it with a thin layer of soil and the process is begun anew.
Start a second crop of microgreens a few days to one week after the first set and you’ll have continuous crops ready for harvest through the winter.
Yum. I must try this. Most things object to the cold temps in my house, but greens should be fine.
I use those same containers as starters for lots of things; the lids keep in moisture, which is important for someone like me, who forgets to water. Sigh.
–Kate
Very pretty setup, the picture with the sunlight shining on the sprouts is so lovely and inspiring.
I’m going to start another batch for my huge window here at the office (why can’t I have a window this pretty at home?!) I ponder if anyone knows what recipes the tasty greens are good for? Other than salad…
They’re also good on sandwiches. And you can top meals with the spicy greens.
I’m trying this for the first time. I’m trying to squeeze the maximum amount of greens out our spring before the triple digit heat comes our way.
Fair warning that if you live in a newer house, especially in the south, your windows may not let in the right frequencies of light and you might have to supplement them with a growlight.
Yeah, I know. They install windows that are supposed to be more energy efficient, so I need to have a growlight. Exactly HOW is this energy-efficient again?
Neato- I tried this a few years back with fennugreek and added the greens when ~2 inches tall to the top of indian curries. One thing you can do to keep mold at bay is water with chamomile tea.
awesome. this looks like something i might actually make work in our teensy flat with no outdoor space, (and not even any windowsills come to that, though there is light!) and i gather these are a pretty trendy ingredient right now, so my dishes will look very chic also… i must find me some seed!
Along the same lines, growing sprouts such as mung bean can be done without a windowsill. I find they too require little effort and time and are great in salads, sandwiches, stir-fries, etc
What a great idea! I’m going to have to try it!
This sounds like a great idea, I’ll have to try it!
Sounds like a great idea, though I suspect my cat will beat me to them.
Thanks for the tutorial!
Would you mind explaining how the results would differ from seeds sprouted in a plastic, soil-less sprouter?
I’ve never come across seeds labeled as “microgreens” (don’t know what we’d call them in French) but I imagine one could use any kind of sprouting seeds?
Thank you!
Clotilde: You can certainly sprout many seeds that way but I have slowed down on promoting that method of sprouting for safety reasons. Some seeds take longer than others to sprout and you have to be diligent about rinsing everyday to keep things clean and avoid what can sometimes be serious bacterial problems. It can absolutely be done, and I still do; however, growing in soil doesn’t run any risks and is safer for those who are more prone to forgetting about their sprouts.
Karl Katzke: Interesting about the new window problem. I’ve always lived in older places with old windows so have never run into that.
Sheer inspiration! Just found your site via “Made from Scratch” – Love it!!!
Think I’ll wonder out to the garage, select a few seeds and see what microgreens I can get going right now…Thanks!
this is so magical! I can’t wait to try it! I especially love the second use for the take-out container.
yay micorgreens! i just started doing this in january and it is sooo satisfying to re-use the grocery store salad mix container to actually GROW local salad in the winter! one thing i also find helps with keeping the top of the soil somewhat dry and avoiding damping off etc is watering from below (ie filling the saucer underneath with water) so that the soil can suck up moisture without getting the very top layer soaked. doesn’t work well over the long term with other seedlings, but with short term micro-greens, it seems to work for me.
I am a computer and garden novice, I am better with the gardening than the computer so please bear with me. I just caught you on “Recreating Eden”and was thrilled to have a new “grass roots” gardening site to go to.Thanks so much.
I enjoyed your show last night .Sure too cold to do much outside here on Vancouver island yet but i have lots of seedlings coming up on a heated cable bed which works great until the power goes out .Love the recycle idea and use them a lot .I will look forward to reading your site from now on